이 튜토리얼은 OFBiz 경험이 거의 또는 전혀없는 초보자를 위해 설계되었습니다. OFBiz 애플리케이션 개발 프로세스의 기본 사항을 다룹니다. 목표는 개발자가 모범 사례, 코딩 규칙, 기본 제어 흐름 및 개발자가 OFBiz 사용자 지정에 필요한 기타 모든 측면에 익숙해 지도록하는 것입니다.
이 자습서는 OFBiz에서 첫 번째 “데모 응용 프로그램”을 구축하는 데 도움이됩니다.
Tutorial
이 튜토리얼에서 설명하는 실습 애플리케이션의 소스 코드는 [TODO]에서 다운로드 할 수 있습니다.
프레임워크 소개 동영상
OFBiz YouTube 채널 또는 Video도 동일하게 액세스 할 수 있습니다.
- 개요 (OFBiz 소개)
- OFBiz 설정 및 실행
- 첫 번째 응용 프로그램 만들기 (Hello World …)
- 양식 및 서비스
- 다른 엔진을 사용하는 서비스
- 이벤트
- 사용자 인터페이스 사용자 지정
- 향후 계획?
개요 (OFBiz 소개)
OFBiz (Open For Business)는 공통 데이터, 논리 및 프로세스 구성 요소를 사용하여 공통 아키텍처를 기반으로 구축 된 엔터프라이즈 응용 프로그램 제품군입니다. 느슨하게 결합 된 응용 프로그램의 특성으로 인해 이러한 구성 요소를 쉽게 이해하고 확장하고 사용자 지정할 수 있습니다.
OFBiz의 도구와 아키텍처를 사용하면 엔터프라이즈 애플리케이션을 효율적으로 개발하고 유지 관리 할 수 있습니다. 이를 통해 우리는 프로젝트의 생성자 및 관리자로서 새로운 기능을 신속하게 출시하고 많은 노력없이 기존 기능을 유지할 수 있습니다. 또한 특정 요구 사항이있을 때 기존 기능을 쉽게 사용자 정의하고 확장 할 수 있습니다.
아키텍처만으로는 응용 프로그램을 필요에 맞게 쉽게 사용자 지정할 수 있지만 시스템에서 가장 뛰어난 유연성 지점 중 상당수는 시스템이 오픈 소스 소프트웨어로 배포되지 않은 경우 의미가 없으며 불가능할 수도 있습니다. OFBiz 는 Apache 라이센스 버전 2.0 (ASL2)에 따라 라이센스가 부여되어 사용자에게 시스템의 사용자 정의, 확장, 수정, 재 포장, 재판매 및 기타 많은 잠재적 인 사용 권한을 부여합니다.
이러한 유형의 소프트웨어를 효과적으로 사용하는 데 필요하다고 생각하므로 이러한 활동에는 제한이 없습니다. GPL과 같은 다른 오픈 소스 라이선스와 달리 변경 사항은 오픈 소스로 릴리스 할 필요가 없습니다. 특정 개선 사항, 수정 사항 및 추가 사항을 핵심 프로젝트에 다시 기여하면 분명한 이점이 있지만 일부 변경 사항에는 일반인에게 공개해서는 안되는 독점 또는 기밀 정보가 포함됩니다. 이러한 이유로 OFBiz는이를 필요로하지 않는 ASL2를 사용합니다. 필요한 것은 파일에서 찾은 “저작권, 특허, 상표 및 저작자 표시 고지”를 제거하지 않는 것입니다 . 오픈 소스 라이선스에 대한 자세한 내용은 OSI (Open Source Initiative) 웹 사이트 ( www.opensource.org )를 참조하십시오 .
이 오픈 소스 모델의 또 다른 이점은 소프트웨어를 사용하는 사람들로부터 지속적인 피드백을 받는다는 것입니다. 우리는 OFBiz의 사용자와 잠재적 인 사용자로부터 수많은 버그 수정, 개선 제안 및 모범 사례 비즈니스 조언을 받았습니다. 프로젝트에서 가장 뛰어난 기능 중 상당수는 프로젝트와 관련된 메일 링리스트에 보내진 의견이나 제안에서 영감을 받았습니다. 수십 개의 조직에서 소프트웨어를 사용하고 아마도 수백 개의 배포 된 사이트에서 한 부분 또는 다른 프로젝트를 사용하여 일반적으로 프로젝트에 대한 이메일을 매일 20-30 개받습니다.
우리의 기능이시기 적절하고 유용한 지 확인하기 위해 우리는 항상 우리가 작업하는 모든 구성 요소에 대한 공개 표준과 일반적인 사용을 조사하는 것으로 시작합니다. 이는 우리가 공통 어휘를 지원하고 사용하는 데 도움이되며 표준 프로세스와 기타 그룹 노력을 통해서만 달성 할 수있는 즉각적인 광범위한 옵션과 기능을 제공합니다. 또한 조직 내부와 파트너 또는 다른 조직 모두에서 동일한 표준을 기반으로 구축 된 다른 시스템과의 유연한 통신을 위해 미래에 문을 엽니 다.
시스템과 함께 제공되는 응용 프로그램 및 응용 프로그램 구성 요소는 모범 사례 기반 설계와 함께있는 그대로 사용하거나 고유 한 특수 요구 사항에 맞게 사용자 정의 할 수있는 광범위하고 유연한 기반을 제공합니다. 이 애플리케이션은 당사자 및 제품에서 회계, 고객 서비스, 내부 자원 및 자산 관리에 이르기까지 모든 것을 쉽게 관리 할 수 있습니다.
참조 : https://ofbiz.apache.org/
OFBiz 설정 및 실행
Apache OFBiz Framework 다운로드
컴퓨터에서 Apache OFBiz Framework를 아직 확인하지 않았다면 해보겠습니다. 누구나 OFBiz 공용 GIT 저장소에서 소스 코드를 체크 아웃하거나 찾아 볼 수 있습니다. Git이없는 경우 여기 로 이동 하여 지침을 확인할 수 있습니다 .
소스 코드를 확인하려면 다음 명령을 사용하십시오 (GUI 클라이언트를 사용하는 경우 적절하게 구성하십시오).
- 트렁크 프레임 워크 : $ git clone https://gitbox.apache.org/repos/asf/ofbiz-framework.git ofbiz-framework
트렁크가 ofbiz-framework 및 ofbiz-plugins 로 분리 되었기 때문에 특수 목적 및 핫 배포 디렉토리가 사라졌습니다.
새 구성 요소는 hot-deploy 디렉토리처럼 작동하는 plugins 디렉토리에 넣어야합니다.
OFBiz 기존 구성 요소의 경우 아래 Gradle 작업을 사용하여 확인하십시오.
모든 구성 요소를 얻으려면 pullAllPluginsSource를 사용 하십시오 . 이전에 존재하던 플러그인 디렉토리가 삭제된다는 점에 유의하십시오.
For Linux/Mac: $ ./gradlew pullAllPluginsSourceFor Windows: > gradlew pullAllPluginsSource |
자세한 내용은 Apache OFBiz 소스 저장소 페이지를 참조하십시오.
Apache OFBiz 실행
- 명령 줄을 사용하여 OFBiz (데모 데이터 포함)를 빌드 및 시작하고 다음 명령을 사용합니다.
For Linux/Mac: $ ./gradlew cleanAll loadAll ofbizFor Windows: > gradlew cleanAll loadAll ofbiz |
위 명령은 OFBiz와 함께 제공되는 데모 데이터 (앱을 실행하기위한 샘플 데이터)를 Derby Database에로드합니다. Derby는 사용할 준비가 된 OFBiz로 구성됩니다.
더 많은 옵션은 README.MD를 참조하십시오.
- 브라우저를 https : // localhost : 8443 / webtools로 이동 하고 사용자 이름 “admin”과 암호 “ofbiz”로 로그인 한 다음 조금 둘러보세요.
이제 Apache OFBiz가 시스템에서 실행 중입니다 !!
첫 번째 응용 프로그램 만들기 (Hello World …)
구성 요소 소개
OFBiz 구성 요소는 “ofbiz-component.xml”이라는 특수 xml 파일이 포함 된 폴더로, 구성 요소에서로드하고 필요한 리소스를 설명합니다.
OFBiz 자체는 구성 요소의 집합입니다.
- 프레임 워크 구성 요소 : 응용 프로그램 구성 요소에 기술 계층과 도구를 제공하는 하위 수준 구성 요소입니다. 이러한 구성 요소에서 제공하는 기능은 일반적으로 다른 개발 프레임 워크 (데이터 계층, 비즈니스 논리 계층, 트랜잭션 처리, 데이터 소스 풀 등)에서 제공하는 기능입니다.
- 애플리케이션 구성 요소 : 확장 / 사용자 정의 할 수있는 ERP 애플리케이션에 필요한 일반 비즈니스 구성 요소입니다 (제품, 주문, 당사자, 제조, 회계 등…). 응용 프로그램 구성 요소는 프레임 워크 구성 요소에서 제공하는 서비스 및 도구와 다른 응용 프로그램 구성 요소에서 게시 한 서비스에 액세스 할 수 있습니다 .
- 플러그인 구성 요소 : 이러한 구성 요소는 응용 프로그램 구성 요소와 유사하지만 전자 상거래, Google 기본 통합, eBay 통합 등과 같은 특수 목적 응용 프로그램을위한 것입니다.
플러그인 / 컴포넌트 생성
플러그인 디렉토리의 OFBiz에서 새로운 사용자 정의 구성 요소를 설정하는 것은 매우 쉽습니다. 명령 줄을 사용하여 다음 명령을 실행하기 만하면됩니다.
$ ./gradlew createPlugin -PpluginId=ofbizDemo |

첫 번째 애플리케이션 실행
첫 번째 구성 요소를 실행하기 전에 ‘Hello to the World’라고 말하겠습니다.
- ofbizDemo 플러그인
_HOME/plugins/ofbizDemo/widget/OfbizDemoScreens.xml에서 $ OFBIZ 파일을 열기 만하면 됩니다 (방금 생성).
<?xml version="1.0" encoding="UTF-8"?>
<screens xmlns:xsi="http://www.w3.org/2001/XMLSchema-instance"
        xsi:noNamespaceSchemaLocation="http://ofbiz.apache.org/dtds/widget-screen.xsd">
    <screen name="main">
        <section>
            <actions>
                <set field="headerItem" value="main"/><!-- this highlights the selected menu-item with name "main" -->
            </actions>
            <widgets>
                <decorator-screen name="OfbizDemoCommonDecorator" location="${parameters.mainDecoratorLocation}">
                    <decorator-section name="body">
                        <label text="Hello World!! :)"/>
                    </decorator-section>
                </decorator-screen>
            </widgets>
        </section>
    </screen>
</screens>
<label text = “Hello World !! :)”/> 만 추가했습니다.
- 이제 데이터 (
./gradlew loadAll ofbiz) 를 다시로드하여 OFBiz를 다시 시작해야합니다 . 구성 요소에 대한 일부 보안 데이터가 포함 된 새 구성 요소를 만들었 기 때문에 필요합니다 (기본적으로 구성 요소 데이터 디렉터리에 설치하고OfbizDemoSecurityGroupDemoData.xml)다시 시작할 때 ofbizdemo 구성 요소도로드됩니다. - OFBiz가 다시 시작되면 브라우저를 여기 https : // localhost : 8443 / ofbizDemo에서 애플리케이션으로 이동합니다.
- 로그인하라는 메시지가 표시됩니다. 사용자로 로그인 : 관리자 암호 : ofbiz.
- 로그인하면 아래 이미지와 같이 화면에 입력 한 hello world 메시지와 함께 ofbizdemo 애플리케이션이 표시됩니다.

그게 다입니다. 첫 번째 구성 요소가 설정 및 실행되었음을 축하합니다 !!
첫 번째 데이터베이스 엔티티 (테이블) 생성
엔티티 정의
데이터베이스에 사용자 지정 엔터티 / 테이블을 만들려면 ofbizdemo 응용 프로그램의 $ OFBIZ_HOME / plugins / ofbizDemo / entitydef / entitymodel.xml 파일에 엔터티 정의를 제공 하기 만하면됩니다. 이 파일 구조는 Gradle 작업을 사용하여 구성 요소를 설정할 때 이미 설정되어 있습니다. 아래에 표시된대로 들어가서 엔티티 정의를 제공하기 만하면됩니다. 여기서는 ofbizdemo 애플리케이션을위한 두 개의 새로운 엔티티를 추가 할 것입니다.
<?xml version="1.0" encoding="UTF-8"?>

<entitymodel xmlns:xsi="http://www.w3.org/2001/XMLSchema-instance"
    xsi:noNamespaceSchemaLocation="http://ofbiz.apache.org/dtds/entitymodel.xsd">

    <title>Entity of an Open For Business Project Component</title>
    <description>None</description>
    <version>1.0</version>

    <entity entity-name="OfbizDemoType" package-name="org.apache.ofbiz.ofbizdemo" title="OfbizDemo Type Entity">
        <field name="ofbizDemoTypeId" type="id"><description>primary sequenced ID</description></field>
        <field name="description" type="description"></field>
        <prim-key field="ofbizDemoTypeId"/>
    </entity>

    <entity entity-name="OfbizDemo" package-name="org.apache.ofbiz.ofbizdemo" title="OfbizDemo Entity">
        <field name="ofbizDemoId" type="id"><description>primary sequenced ID</description></field>
        <field name="ofbizDemoTypeId" type="id"></field>
        <field name="firstName" type="name"></field>
        <field name="lastName" type="name"></field>
        <field name="comments" type="comment"></field>
        <prim-key field="ofbizDemoId"/>
        <relation type="one" fk-name="ODEM_OD_TYPE_ID" rel-entity-name="OfbizDemoType">
            <key-map field-name="ofbizDemoTypeId"/>
        </relation>
    </entity>

</entitymodel>
이제 $ OFBIZ_HOME / plugins / ofbizDemo / ofbiz-component.xml 파일을 살펴보십시오. 구성 요소가로드 될 때 이러한 엔터티를 정의에서 데이터베이스로로드하기위한 리소스 항목이 이미 있습니다. 아래 그림과 같이:
<entity-resource type="model" reader-name="main" loader="main" location="entitydef/entitymodel.xml"/>확인하려면 간단히 OFBiz를 다시 시작하고 (Ctrl + C 다음에 “./gradlew ofbiz”) 브라우저를 엔티티 데이터 유지 관리 도구 ( https : // localhost : 8443 / webtools / control / entitymaint)로 이동 하고 엔티티 OfbizDemoType 및 OfbizDemo. 아래 주어진 이미지와 같이 볼 수 있습니다.

엔티티에 대한 데이터 준비
사용자 지정 엔터티를 설정 했으므로 이제 샘플 데이터를 준비해야합니다. $ OFBIZ_HOME / plugins / ofbizDemo / data / OfbizDemoTypeData.xml 및 $ OFBIZ_HOME / plugins / ofbizDemo / data / OfbizDemoDemoData.xml 로 구성 요소의 데이터 디렉터리에 이미 설정된 데이터 XML 파일에서 수행 할 수 있습니다 . 아래와 같이 설정합니다.
OfbizDemoTypeData.xml
<?xml version="1.0" encoding="UTF-8"?>
<entity-engine-xml>
    <OfbizDemoType ofbizDemoTypeId="INTERNAL" description="Internal Demo - Office"/>
    <OfbizDemoType ofbizDemoTypeId="EXTERNAL" description="External Demo - On Site"/>
</entity-engine-xml>
OfbizDemoDemoData.xml
<?xml version="1.0" encoding="UTF-8"?>
<entity-engine-xml>
    <OfbizDemo ofbizDemoId="SAMPLE_DEMO_1" ofbizDemoTypeId="INTERNAL" firstName="Sample First 1" lastName="Sample Last 1" comments="This is test comment for first record."/>
    <OfbizDemo ofbizDemoId="SAMPLE_DEMO_2" ofbizDemoTypeId="INTERNAL" firstName="Sample First 2" lastName="Sample last 2" comments="This is test comment for second record."/>
    <OfbizDemo ofbizDemoId="SAMPLE_DEMO_3" ofbizDemoTypeId="EXTERNAL" firstName="Sample First 3" lastName="Sample last 3" comments="This is test comment for third record."/>
    <OfbizDemo ofbizDemoId="SAMPLE_DEMO_4" ofbizDemoTypeId="EXTERNAL" firstName="Sample First 4" lastName="Sample last 4" comments="This is test comment for fourth record."/>
</entity-engine-xml>
이제 다시 $ OFBIZ_HOME / plugins / ofbizDemo / ofbiz-component.xml 파일을 살펴보십시오 . 다음과 같이 이러한 파일에 준비된 데이터를로드하기위한 리소스 항목이 이미 있습니다.
ofbiz-component.xml에서 수행 할 항목
<entity-resource type="data" reader-name="seed" loader="main" location="data/OfbizDemoTypeData.xml"/>
<entity-resource type="data" reader-name="demo" loader="main" location="data/OfbizDemoDemoData.xml"/>
엔티티에 데이터로드
현재이 샘플 데이터를 정의 된 엔티티 / 테이블에로드하려면 ./gradlew loadAll콘솔에서 실행 하거나 webtools에서 직접 여기로 이동하여 엔티티 xml https : // localhost : 8443 / webtools / control / EntityImport 를로드 할 수 있습니다 .
아래 주어진 이미지와 같이 “Complete XML document (root tag : entity-engine-xml) :”텍스트 영역에 xml 데이터를 넣고 “Import Text”를 누르기 만하면됩니다.
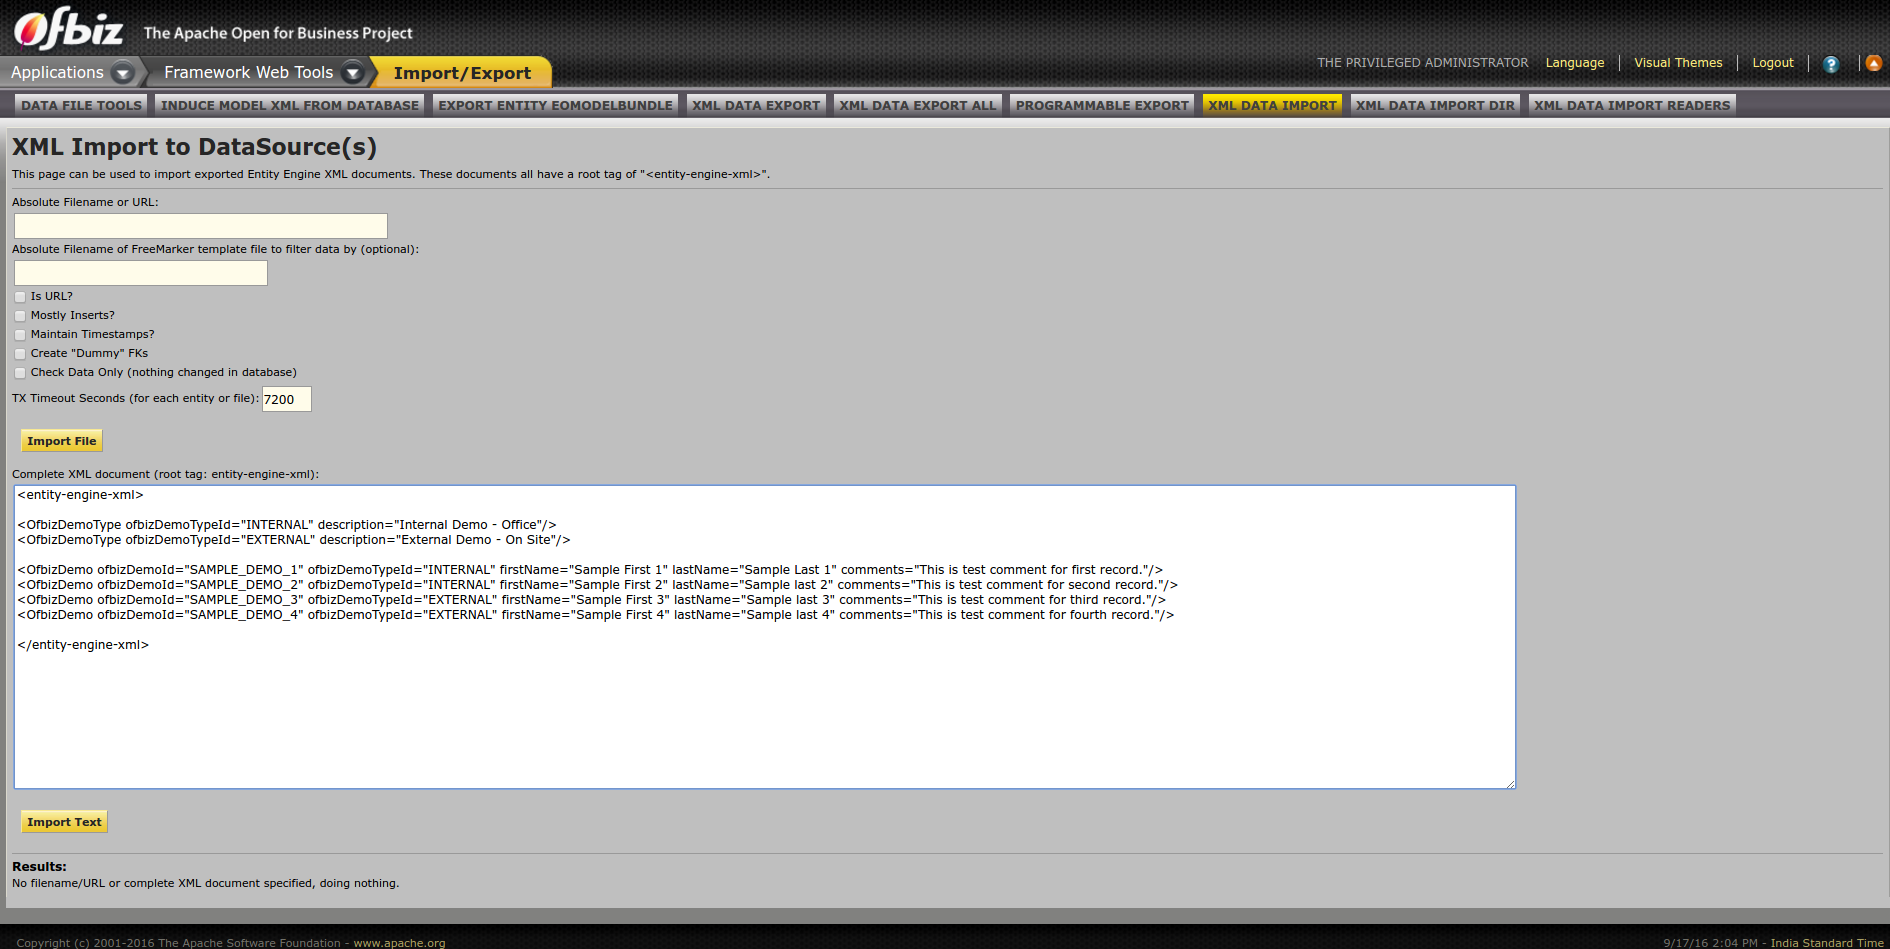
텍스트 가져 오기를 누르면 데이터가로드되고 아래와 같이 결과가 표시됩니다.
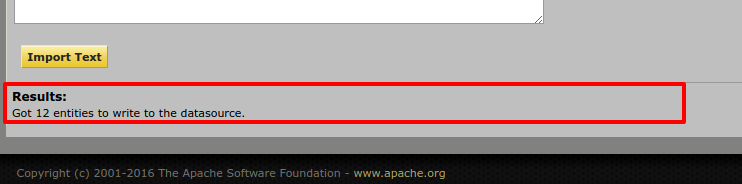
데이터로드 프로세스를 완료 한 후 엔터티 데이터 유지 관리 ( https : // localhost : 8443 / webtools / control / entitymaint )를 다시 방문 하여 엔터티를 확인하면 방금로드 한이 데이터를 찾을 수 있습니다.
그게 바로 데이터베이스 테이블의 데이터를 성공적으로 가져 왔습니다. 아주 쉽습니다.
양식 및 서비스
이전 섹션에서 엔터티 (테이블)를 만드는 방법을 보았습니다. 이제 해당 엔터티에 항목을 만들 수있는 양식을 만들 차례입니다.
서비스 생성
양식을 작성하기 전에 서비스 정의 xml 파일 ($ OFBIZ_HOME / plugins / ofbizDemo / servicedef / services.xml)에 OfbizDemo 엔티티에 대한 데이터베이스에 레코드를 생성 하는 서비스 를 작성해 보겠습니다.
services.xml
<?xml version="1.0" encoding="UTF-8"?>
<services xmlns:xsi="http://www.w3.org/2001/XMLSchema-instance"
        xsi:noNamespaceSchemaLocation="http://ofbiz.apache.org/dtds/services.xsd">

    <description>OfbizDemo Services</description>
    <vendor></vendor>
    <version>1.0</version>

    <service name="createOfbizDemo" default-entity-name="OfbizDemo" engine="entity-auto" invoke="create" auth="true">
        <description>Create an Ofbiz Demo record</description>
        <auto-attributes include="pk" mode="OUT" optional="false"/>
        <auto-attributes include="nonpk" mode="IN" optional="false"/>
        <override name="comments" optional="true"/>
    </service>

</services>
이제 다시 $ OFBIZ_HOME / plugins / ofbizDemo / ofbiz-component.xml 파일을 살펴보십시오. 이 파일에 다음과 같이 정의 된 서비스를로드하기위한 리소스 항목이 이미 있습니다.
<!-- service resources: model(s), eca(s) and group definitions -->
<service-resource type="model" loader="main" location="servicedef/services.xml"/>
이 서비스 정의를로드하려면 OFBiz를 다시 시작해야합니다. 이 서비스를 테스트하려면 webtools-> Run Service 옵션 ( https : // localhost : 8443 / webtools / control / runService)으로 직접 이동합니다 .

웹 도구를 통한 서비스 실행 : 서비스를 실행하기 위해 프레임 워크에서 제공하는 스마트 유틸리티입니다.
위의 양식을 제출하면 서비스의 IN 매개 변수를 입력 할 수있는 양식이 제시됩니다.
UI 레이블 사용 (소개)
Apache OFBiz의 국제화는 정말 쉽습니다. 다양한 언어로 UI 레이블을 정의하고 사용자의 로케일에 따라 각 레이블이 표시됩니다.
다음은 UI 레이블의 예입니다 (구성 요소를 만드는 동안 <component-name> UiLabels.xml이 기본적으로 생성되며,이 경우에는 OfbizDemoUiLabels.xml ).
OfbizDemoUiLabels.xml
<?xml version="1.0" encoding="UTF-8"?>
<resource xmlns:xsi="http://www.w3.org/2001/XMLSchema-instance" xsi:noNamespaceSchemaLocation="http://ofbiz.apache.org/dtds/ofbiz-properties.xsd">
    <property key="OfbizDemoApplication">
        <value xml:lang="en">OfbizDemo Application</value>
        <value xml:lang="zh">OfbizDemo应用程�?</value>
        <value xml:lang="zh-TW">OfbizDemo應用程�?</value>
    </property>
    <property key="OfbizDemoCompanyName">
        <value xml:lang="en">OFBiz: OfbizDemo</value>
        <value xml:lang="zh-TW">OFBiz: OfbizDemo</value>
    </property>
    <property key="OfbizDemoCompanySubtitle">
        <value xml:lang="en">Part of the Apache OFBiz Family of Open Source Software</value>
        <value xml:lang="it">Un modulo della famiglia di software open source Apache OFBiz</value>
        <value xml:lang="zh">开�?软件OFBiz的组�?部分</value>
        <value xml:lang="zh-TW">開�?軟體OFBiz的組�?部分</value>
    </property>
    <property key="OfbizDemoViewPermissionError">
        <value xml:lang="en">You are not allowed to view this page.</value>
        <value xml:lang="zh">�?�?许你�?览这个页�?�。</value>
        <value xml:lang="zh-TW">�?�?許您檢視這個�?�?�.</value>
    </property>
</resource>
추가 양식 만들기
이 서비스에 대한 첫 번째 양식을 만들고이를 위해 $ OFBIZ_HOME / plugins / ofbizDemo / widget / OfbizDemoForms.xml 위치에있는 기존 파일을 편집하고 아래와 같이 OfbizDemo에 대한 양식 만들기를 추가합니다.
OfbizDemoForms.xml
<?xml version="1.0" encoding="UTF-8"?>
<forms xmlns:xsi="http://www.w3.org/2001/XMLSchema-instance"
        xsi:noNamespaceSchemaLocation="http://ofbiz.apache.org/dtds/widget-form.xsd">

    <form name="AddOfbizDemo" type="single" target="createOfbizDemo">
        <!-- We have this utility in OFBiz to render form based on service definition.
             Service attributes will automatically lookedup and will be shown on form
        -->
        <auto-fields-service service-name="createOfbizDemo"/>
        <field name="ofbizDemoTypeId" title="${uiLabelMap.CommonType}">
            <drop-down allow-empty="false" current-description="">
                <!---We have made this drop down options dynamic(Values from db) using this -->
                <entity-options description="${description}" key-field-name="ofbizDemoTypeId" entity-name="OfbizDemoType">
                    <entity-order-by field-name="description"/>
                </entity-options>
            </drop-down>
        </field>
        <field name="submitButton" title="${uiLabelMap.CommonAdd}"><submit button-type="button"/></field>
    </form>
</forms>
여기서 auto-fields-service를 사용하여 서비스 정의 IN / OUT 속성을 기반으로 양식을 자동 생성했음을 알 수 있습니다.
Screens xml 파일 (OfbizDemoScreens.xml)로 이동하여 Hello World … 텍스트를 표시하는 데 사용한 화면에 데코레이터 본문의이 양식 위치를 추가합니다. 아래 그림과 같이
메인 화면에 양식 위치 추가
<?xml version="1.0" encoding="UTF-8"?>
<screens xmlns:xsi="http://www.w3.org/2001/XMLSchema-instance"
        xsi:noNamespaceSchemaLocation="http://ofbiz.apache.org/dtds/widget-screen.xsd">

    <screen name="main">
        <section>
            <actions>
                <set field="headerItem" value="main"/> <!-- this highlights the selected menu-item with name "main" -->
            </actions>
            <widgets>
                <decorator-screen name="main-decorator" location="${parameters.mainDecoratorLocation}">
                    <decorator-section name="body">
                        <screenlet title="Add Ofbiz Demo">
                            <include-form name="AddOfbizDemo" location="component://ofbizDemo/widget/OfbizDemoForms.xml"/>
                        </screenlet>
                    </decorator-section>
                </decorator-screen>
            </widgets>
        </section>
    </screen>
</screens>
양식에 대한 컨트롤러 항목
양식으로 이동하여 추가 양식에서 OfbizDemo 레코드 생성을 시작하기 전에 $ OFBIZ_HOME / plugins / ofbizDemo / webapp / ofbizDemo / WEB-INF / controller.xml 파일에 항목을 작성해야합니다. 양식이 제출됩니다. ofbizdemo 앱 컨트롤러 파일의 Request Mappings에서 아래와 같이 수행 할 수 있습니다.
<request-map uri="createOfbizDemo">
    <security https="true" auth="true"/>
    <event type="service" invoke="createOfbizDemo"/>
    <response name="success" type="view" value="main"/>
</request-map>
모든 것이 설정 되었으므로 최근에 만든 양식 https : // localhost : 8443 / ofbizDemo를 살펴 보겠습니다.

기본 키 (ofbizDemoId)는 양식과 함께 보낼 필요가 없으며, DB 레코드에서 OFBiz에 의해 자동 시퀀싱됩니다.
찾기 양식 만들기
생성중인 OfbizDemos를 검색 할 수 있도록 개체 OfbizDemo에 대한 찾기 양식을 만들어 보겠습니다.
1.) OfbizDemoForms.xml에 양식 (FindOfbizDemo 및 ListOfbizDemo)을 추가합니다.
OfbizDemoForms.xml
<form name="FindOfbizDemo" type="single" target="FindOfbizDemo" default-entity-name="OfbizDemo">
    <field name="noConditionFind"><hidden value="Y"/> <!-- if this isn't there then with all fields empty no query will be done --></field>
    <field name="ofbizDemoId" title="${uiLabelMap.OfbizDemoId}"><text-find/></field>
    <field name="firstName" title="${uiLabelMap.OfbizDemoFirstName}"><text-find/></field>
    <field name="lastName" title="${uiLabelMap.OfbizDemoLastName}"><text-find/></field>
    <field name="ofbizDemoTypeId" title="${uiLabelMap.OfbizDemoType}">
        <drop-down allow-empty="true" current-description="">
            <entity-options description="${description}" key-field-name="ofbizDemoTypeId" entity-name="OfbizDemoType">
                <entity-order-by field-name="description"/>
            </entity-options>
        </drop-down>
    </field>
    <field name="searchButton" title="${uiLabelMap.CommonFind}" widget-style="smallSubmit"><submit button-type="button" image-location="/images/icons/magnifier.png"/></field>
</form>

<form name="ListOfbizDemo" type="list" list-name="listIt" paginate-target="FindOfbizDemo" default-entity-name="OfbizDemo" separate-columns="true"
    odd-row-style="alternate-row" header-row-style="header-row-2" default-table-style="basic-table hover-bar">
    <actions>
       <!-- Preparing search results for user query by using OFBiz stock service to perform find operations on a single entity or view entity -->
       <service service-name="performFind" result-map="result" result-map-list="listIt">
           <field-map field-name="inputFields" from-field="ofbizDemoCtx"/>
           <field-map field-name="entityName" value="OfbizDemo"/>
           <field-map field-name="orderBy" from-field="parameters.sortField"/>
           <field-map field-name="viewIndex" from-field="viewIndex"/>
           <field-map field-name="viewSize" from-field="viewSize"/>
        </service>
    </actions>
    <field name="ofbizDemoId" title="${uiLabelMap.OfbizDemoId}"><display/></field>
    <field name="ofbizDemoTypeId" title="${uiLabelMap.OfbizDemoType}"><display-entity entity-name="OfbizDemoType"/></field>
    <field name="firstName" title="${uiLabelMap.OfbizDemoFirstName}" sort-field="true"><display/></field>
    <field name="lastName" title="${uiLabelMap.OfbizDemoLastName}" sort-field="true"><display/></field>
    <field name="comments" title="${uiLabelMap.OfbizDemoComment}"><display/></field>
</form>
Form 또는 Screen의 작업 태그는 뷰에 대한 데이터 준비 논리에 사용됩니다.
우리는 OOTB OFBiz 일반 서비스 performFind를 사용하여 하나의 엔티티 또는 하나의 뷰 엔티티에 대해 검색을 수행해야 할 때 사용하기 쉽고 효율적인 검색 작업을 수행했습니다.
2.) 다음 단계에서는 이러한 양식을 화면에 포함 시키고이 양식을 OfbizDemoScreens.xml 파일 에 추가하겠습니다 . 이를 위해 포함 FindOfbizDemo의 에 아래에 정의 화면 OfbizDemoScreens.xml을
<!-- Find and list all ofbizdemos in a tabular format -->
<screen name="FindOfbizDemo">
    <section>
        <actions>
            <set field="headerItem" value="findOfbizDemo"/>
            <set field="titleProperty" value="PageTitleFindOfbizDemo"/>
            <set field="ofbizDemoCtx" from-field="parameters"/>
        </actions>
        <widgets>
            <decorator-screen name="main-decorator" location="${parameters.mainDecoratorLocation}">
                <decorator-section name="body">
                    <section>
                        <condition>
                            <if-has-permission permission="OFBIZDEMO" action="_VIEW"/>
                        </condition>
                        <widgets>
                            <decorator-screen name="FindScreenDecorator" location="component://common/widget/CommonScreens.xml">
                                <decorator-section name="search-options">
                                    <include-form name="FindOfbizDemo" location="component://ofbizDemo/widget/OfbizDemoForms.xml"/>
                                </decorator-section>
                                <decorator-section name="search-results">
                                    <include-form name="ListOfbizDemo" location="component://ofbizDemo/widget/OfbizDemoForms.xml"/>
                                </decorator-section>
                            </decorator-screen>
                        </widgets>
                        <fail-widgets>
                            <label style="h3">${uiLabelMap.OfbizDemoViewPermissionError}</label>
                       </fail-widgets>
                    </section>
                </decorator-section>
            </decorator-screen>
        </widgets>
    </section>
</screen>
3.) controller.xml에서이 새로운 Find Ofbiz 데모 페이지에 액세스하기위한 요청 매핑 추가
<!-- Request Mapping -->
<request-map uri="FindOfbizDemo"><security https="true" auth="true"/><response name="success" type="view" value="FindOfbizDemo"/></request-map>

<!-- View Mapping -->
<view-map name="FindOfbizDemo" type="screen" page="component://ofbizDemo/widget/OfbizDemoScreens.xml#FindOfbizDemo"/>
4.) 이제 찾기 옵션을 보여주는 새로운 메뉴를 추가해 보겠습니다.
OFBiz에서 메뉴를 만드는 것은 정말 간단합니다. 정의 된 모든 메뉴는 * menus.xml입니다.
Gra에서 구성 요소를 만들 때 OfbizDemoMenus.xml 이라는 파일을 얻습니다
. OfbizDemoMenus.xml 파일에 다음 항목을 만듭니다.
OfbizDemoMenus.xml
<?xml version="1.0" encoding="UTF-8"?>
<menus xmlns:xsi="http://www.w3.org/2001/XMLSchema-instance" xsi:noNamespaceSchemaLocation="http://ofbiz.apache.org/dtds/widget-menu.xsd">
    <menu name="MainAppBar" title="${uiLabelMap.OfbizDemoApplication}" extends="CommonAppBarMenu" extends-resource="component://common/widget/CommonMenus.xml">
        <menu-item name="main" title="${uiLabelMap.CommonMain}"><link target="main"/></menu-item>
        <menu-item name="findOfbizDemo" title="${uiLabelMap.OfbizDemoFind}"><link target="FindOfbizDemo"/></menu-item>
    </menu>
</menus>
UI 라벨 사용 (완료)
위에서 보았 듯이 Apache OFBiz의 국제화는 정말 쉽습니다. 다양한 언어로 UI 레이블을 정의하고 사용자의 로케일에 따라 각 레이블이 표시됩니다.
여기에서 UI 레이블의 예를 완료합니다 (구성 요소를 만드는 동안 <component-name> UiLabels.xml이 기본적으로 생성되며,이 경우에는 OfbizDemoUiLabels.xml ).
OfbizDemoUiLabels.xml
<property key="OfbizDemoFind">
    <value xml:lang="en">Find</value>
</property>
<property key="OfbizDemoFirstName">
    <value xml:lang="en">First Name</value>
</property>
<property key="OfbizDemoId">
    <value xml:lang="en">OFBiz Demo Id</value>
</property>
<property key="OfbizDemoLastName">
   <value xml:lang="en">Last Name</value>
</property>
이제 서버를 다시 시작하면 ofbizdemo 애플리케이션 ( https : // localhost : 8443 / ofbizDemo / control / main )에서 찾기 메뉴 옵션이 표시됩니다.

다른 엔진을 사용하는 서비스
비즈니스 로직을 구축해야 할 때마다 기본 제공 서비스 엔진의 기능을 활용하는 서비스를 작성하는 것이 좋습니다.
이전에 만든 서비스 “createOfbizDemo”는 engine = “entity-auto”를 사용하고 있었으므로 구현을 제공 할 필요가 없었고 OFBiz가 생성 작업을 처리했습니다. 데이터베이스의 여러 엔터티와 빌드 할 사용자 지정 논리를 포함하는 서비스의 복잡한 작업을 수행해야하는 경우 서비스에 사용자 지정 구현을 제공해야합니다. 이 섹션에서는 이에 초점을 맞출 것입니다.
자바 서비스
아래 단계에서 지시 한대로 Java로 서비스를 구현할 수 있습니다.
1.) 서비스를 정의하십시오. 여기서도 사용자 정의 Ofbiz 데모 애플리케이션의 동일한 엔티티 (OfbizDemo)에서 작동합니다. 서비스 정의 파일 $ OFBIZ_HOME / plugins / ofbizDemo / servicedef / services.xml을 열고 다음과 같이 새 정의를 추가하십시오.
services.xml
<service name="createOfbizDemoByJavaService" default-entity-name="OfbizDemo" engine="java"
        location="com.companyname.ofbizdemo.services.OfbizDemoServices" invoke="createOfbizDemo" auth="true">
    <description>Create an Ofbiz Demo record using a service in Java</description>
    <auto-attributes include="pk" mode="OUT" optional="false"/>
    <auto-attributes include="nonpk" mode="IN" optional="false"/>
    <override name="comments" optional="true"/>
</service>
이번에는 engine = “java”를 사용했습니다.
2.) ofbizDemo 구성 요소 src / main / java 디렉토리에 “com.companyname.ofbizdemo.services”패키지를 만듭니다 (src 디렉토리에없는 경우 생성).
예 : src / main / java / com / companyname / ofbizdemo / services. Java로 구현해야하는 애플리케이션 서비스는이 Java 디렉토리에 배치 할 수 있습니다.
3.) 여기 서비스 디렉토리의 OfbizDemoServices.java 파일에 새 Java 클래스를 정의하고 아래와 같이 서비스 정의에 의해 호출 될 메서드를 구현합니다.
OfbizDemoServices.java
package com.companyname.ofbizdemo.services;
import java.util.Map;

import org.apache.ofbiz.base.util.Debug;
import org.apache.ofbiz.entity.Delegator;
import org.apache.ofbiz.entity.GenericEntityException;
import org.apache.ofbiz.entity.GenericValue;
import org.apache.ofbiz.service.DispatchContext;
import org.apache.ofbiz.service.ServiceUtil;

public class OfbizDemoServices {

    public static final String module = OfbizDemoServices.class.getName();

    public static Map<String, Object> createOfbizDemo(DispatchContext dctx, Map<String, ? extends Object> context) {
        Map<String, Object> result = ServiceUtil.returnSuccess();
        Delegator delegator = dctx.getDelegator();
        try {
            GenericValue ofbizDemo = delegator.makeValue("OfbizDemo");
            // Auto generating next sequence of ofbizDemoId primary key
            ofbizDemo.setNextSeqId();
            // Setting up all non primary key field values from context map
            ofbizDemo.setNonPKFields(context);
            // Creating record in database for OfbizDemo entity for prepared value
            ofbizDemo = delegator.create(ofbizDemo);
            result.put("ofbizDemoId", ofbizDemo.getString("ofbizDemoId"));
            Debug.log("==========This is my first Java Service implementation in Apache OFBiz. OfbizDemo record created successfully with ofbizDemoId:"+ofbizDemo.getString("ofbizDemoId"));
        } catch (GenericEntityException e) {
            Debug.logError(e, module);
            return ServiceUtil.returnError("Error in creating record in OfbizDemo entity ........" +module);
        }
        return result;
    }
}
4.) 서버를 중지하고 “./gradlew ofbiz”를 사용하여 다시 시작하면 클래스가 컴파일되고 업데이트 된 jar 파일을 ofbiz가 다시 시작할 때 사용할 수있게됩니다.
5.) webtools-> Run Service 옵션 ( https : // localhost : 8443 / webtools / control / runService )을 사용하여 구현 된 서비스를 테스트 하거나 컨트롤러 요청에 의해 호출되는 서비스 이름을 업데이트하여 대신이 서비스를 사용하고 추가 양식을 사용하십시오. 앞서 준비한 앱에서. 이렇게하면 Add OfbizDemo 양식이이 Java 서비스를 호출합니다.
<request-map uri="createOfbizDemo">
    <security https="true" auth="true"/>
    <event type="service" invoke="createOfbizDemoByJavaService"/>
    <response name="success" type="view" value="main"/>
</request-map>
이 새로운 서비스 구현이 실행되고 있는지 확인하려면 Debug.log (….)를 사용하여 코드에 입력 한 콘솔 로그에서이 줄을 확인할 수 있습니다. OFBiz에 로그인하려면 Java 클래스에서 항상 Debug 클래스 메소드를 사용해야합니다.
콘솔 로그
[java] 2014-06-24 12:11:37,282 (http-bio-0.0.0.0-8443-exec-2) [  OfbizDemoServices.java:28 :INFO] ==========This is
my first Java Service implementation in Apache OFBiz. OfbizDemo record created successfully with ofbizDemoId: ......
Groovy의 서비스
즉석 컴파일 기능을 활용하고 코드 줄을 줄이려면 Groovy DSL을 사용하여 OFBiz에서 비즈니스 로직을 구축하기위한 서비스를 구현할 수 있습니다.
Groovy를 사용하여 서비스를 구현하려면 다음 단계를 따르십시오.
1.) services / services.xml 파일에 새 서비스 정의를 다음과 같이 추가하십시오.
services.xml
<service name="createOfbizDemoByGroovyService" default-entity-name="OfbizDemo" engine="groovy"
        location="component://ofbizDemo/groovyScripts/ofbizdemo/OfbizDemoServices.groovy" invoke="createOfbizDemo" auth="true">
    <description>Create an Ofbiz Demo record using a service in Groovy</description>
    <auto-attributes include="pk" mode="OUT" optional="false"/>
    <auto-attributes include="nonpk" mode="IN" optional="false"/>
    <override name="comments" optional="true"/>
</service>
2.) 여기에 새로운 groovy 서비스 파일을 추가하십시오 component : //ofbizDemo/groovyScripts/ofbizdemo/OfbizDemoServices.groovy
3.) OfbizDemoServices.groovy 파일에 서비스 구현 추가
OfbizDemoServices.groovy
import org.apache.ofbiz.entity.GenericEntityException;

def createOfbizDemo() {
    result = [:];
    try {
        ofbizDemo = delegator.makeValue("OfbizDemo");
        // Auto generating next sequence of ofbizDemoId primary key
        ofbizDemo.setNextSeqId();
        // Setting up all non primary key field values from context map
        ofbizDemo.setNonPKFields(context);
        // Creating record in database for OfbizDemo entity for prepared value
        ofbizDemo = delegator.create(ofbizDemo);
        result.ofbizDemoId = ofbizDemo.ofbizDemoId;
        logInfo("==========This is my first Groovy Service implementation in Apache OFBiz. OfbizDemo record "
                  +"created successfully with ofbizDemoId: "+ofbizDemo.getString("ofbizDemoId"));
      } catch (GenericEntityException e) {
          logError(e.getMessage());
          return error("Error in creating record in OfbizDemo entity ........");
      }
      return result;
}
4.) 서버를 중지하고 “./gradlew ofbiz”를 사용하여 다시 시작합니다. 이번에는 새 서비스 정의를로드하기 만하면됩니다. Groovy의 서비스 구현으로 명시적인 컴파일이 필요하지 않습니다.
5.) webtools-> Run Service 옵션 ( https : // localhost : 8443 / webtools / control / runService )을 사용하여 구현 된 서비스를 테스트 하거나 컨트롤러 요청에 의해 호출되는 서비스 이름을 업데이트하여 대신이 서비스를 사용하고 추가 양식을 사용하십시오. 테스트를 위해 이전에 준비한 앱에서. 이렇게하면 Add OfbizDemo 양식이이 훌륭한 서비스를 호출합니다.
controller.xml
<request-map uri="createOfbizDemo">
    <security https="true" auth="true"/>
    <event type="service" invoke="createOfbizDemoByGroovyService"/>
    <response name="success" type="view" value="main"/>
</request-map>
이 새로운 서비스 구현이 실행되고 있는지 확인하려면 Debug.log (….)를 사용하여 코드에 입력 한 콘솔 로그에서이 줄을 확인할 수 있습니다. OFBiz에 로그인하려면 Java 클래스에서 항상 Debug 클래스 메소드를 사용해야합니다.
콘솔 로그
[java] 2014-06-24 12:11:37,282 (http-bio-0.0.0.0-8443-exec-2) [  OfbizDemoServices.java:28 :INFO] ==========This is my
first Groovy Service implementation in Apache OFBiz. OfbizDemo record created successfully with ofbizDemoId: .....
Apache OFBiz에서 서비스 및 이벤트 구현을 위해 Groovy DSL을 사용하는 방법에 대한 자세한 내용은 여기 에서 OFBiz Wiki의 Jacopo Cappellato가 만든 문서를 참조 하십시오 .
이벤트
이벤트 데모
Apache OFBiz의 이벤트는 HttpServletRequest 및 HttpServletResponse 개체와 함께 작동하는 데 사용되는 단순한 메서드입니다. 서비스에서와 같이 정의를 제공 할 필요가 없습니다. 이들은 컨트롤러에서 직접 호출됩니다. 이벤트는 입력 매개 변수에 사용자 정의 서버 측 유효성 검증을 추가하려는 경우에도 유용합니다. db 작업을 수행하기 위해 이벤트에서 미리 빌드 된 서비스를 호출합니다.
OFBiz에서 이벤트를 작성하려면 다음 단계를 따르십시오.
1.) 패키지에 새 이벤트 디렉토리를 추가하고 여기에 언급 된대로 새 이벤트 클래스 파일을 추가하십시오.
OfbizDemoEvents.java
package com.companyname.ofbizdemo.events;

import javax.servlet.http.HttpServletRequest;
import javax.servlet.http.HttpServletResponse;

import org.apache.ofbiz.base.util.Debug;
import org.apache.ofbiz.base.util.UtilMisc;
import org.apache.ofbiz.base.util.UtilValidate;
import org.apache.ofbiz.entity.Delegator;
import org.apache.ofbiz.entity.GenericValue;
import org.apache.ofbiz.service.GenericServiceException;
import org.apache.ofbiz.service.LocalDispatcher;

public class OfbizDemoEvents {

 public static final String module = OfbizDemoEvents.class.getName();

    public static String createOfbizDemoEvent(HttpServletRequest request, HttpServletResponse response) {
        Delegator delegator = (Delegator) request.getAttribute("delegator");
        LocalDispatcher dispatcher = (LocalDispatcher) request.getAttribute("dispatcher");
        GenericValue userLogin = (GenericValue) request.getSession().getAttribute("userLogin");

        String ofbizDemoTypeId = request.getParameter("ofbizDemoTypeId");
        String firstName = request.getParameter("firstName");
        String lastName = request.getParameter("lastName");

        if (UtilValidate.isEmpty(firstName) || UtilValidate.isEmpty(lastName)) {
            String errMsg = "First Name and Last Name are required fields on the form and can't be empty.";
            request.setAttribute("_ERROR_MESSAGE_", errMsg);
            return "error";
        }
        String comments = request.getParameter("comments");

        try {
            Debug.logInfo("=======Creating OfbizDemo record in event using service createOfbizDemoByGroovyService=========", module);
            dispatcher.runSync("createOfbizDemoByGroovyService", UtilMisc.toMap("ofbizDemoTypeId", ofbizDemoTypeId,
                    "firstName", firstName, "lastName", lastName, "comments", comments, "userLogin", userLogin));
        } catch (GenericServiceException e) {
            String errMsg = "Unable to create new records in OfbizDemo entity: " + e.toString();
            request.setAttribute("_ERROR_MESSAGE_", errMsg);
            return "error";
        }
        request.setAttribute("_EVENT_MESSAGE_", "OFBiz Demo created succesfully.");
        return "success";
    }
}
2.)이 이벤트를 호출하는 컨트롤러 요청을 다음과 같이 추가합니다.
controller.xml
<request-map uri="createOfbizDemoEvent">
    <security https="true" auth="true"/>
    <event type="java" path="com.companyname.ofbizdemo.events.OfbizDemoEvents" invoke="createOfbizDemoEvent"/>
    <response name="success" type="view" value="main"/>
    <response name="error" type="view" value="main"/>
</request-map>
3.) # 1에서 추가 한 Java 이벤트 클래스를 컴파일해야하므로 서버를 다시 빌드하여 중지하고 시작합니다.
4.) 이제 이벤트를 테스트하기 위해 AddOfbizDemo 양식 대상을 “createOfbizDemoEvent”로 변경하면됩니다. 이제 제출 된대로 이벤트를 호출합니다.
서비스와 이벤트의 차이점
서비스와 이벤트의 차이점은 다음과 같습니다.
- 이벤트는 맵 프로세서를 사용한 유효성 검사 및 변환에 사용되는 반면 서비스는 CRUD 작업과 같은 비즈니스 논리에 사용됩니다.
- 서비스가 Map을 반환합니다.
- 이벤트는 문자열을 반환합니다.
- 서비스는 서버와 함께로드되며 정의 변경 (MiniLang의 경우 구현이 아님)은 다시로드해야합니다.
- 이벤트 내 서비스를 부를 수 있습니다. 그러나 서비스 내부 이벤트를 호출 할 수 없습니다.
- 이벤트는 일반적으로 한 곳에서 한 가지 목적으로 사용되며 해당 위치에서 호출되는 특정 로컬 조각 기능입니다.
- 서비스는 네트워크의 어느 곳에 나 위치 할 수있는 기능의 일부이며 대부분의 경우 여러 다른 위치에서 사용되며 ‘이름’으로 호출됩니다 .
- 이벤트의 경우 HttpServletRequest 및 HttpServletResponse 개체에 액세스 할 수 있으며 원하는 것을 읽고 쓸 수 있습니다. 서비스의 경우 서비스 매개 변수에만 액세스 할 수 있습니다.
참조 : https://cwiki.apache.org/confluence/display/OFBIZ/FAQ+-+Tips+-+Tricks+-+Cookbook+-+HowTo#FAQ-Tips-Tricks-Cookbook-HowTo-DifferenceBetweenEventAndService 및 http : // ofbiz. 135035.n4.nabble.com
| 기준 | 서비스 | 이벤트 |
|---|---|---|
| 정의 필요 | 예 | 아니 |
| 구현 가능성 | 엔티티 자동, Java, Simple (XML) 및 Groovy | 단순 (XML), Java 및 Groovy |
| 반환 유형 | 지도 | 끈 |
| 비즈니스 로직 작성에 사용 | 예 | 아니 |
| Job Scheduling 가능 | 예 | 아니 |
사용자 인터페이스 사용자 지정
FreeMarker 템플릿 및 Groovy 스크립트 사용
좋습니다. 이제 우리는 OFBiz 튜토리얼의 마지막 부분에 있습니다. 이 부분에서는 비즈니스 관리 앱 (예 : 백엔드 앱 및 esp)을위한 Apache OFBiz의 UI 계층을 사용자 지정하는 데 중점을 둡니다. 대부분의 경우 OFBiz 위젯으로 충분합니다. 그러나 때때로 중요한 것은 사용자가 원하는대로 애플리케이션을 개발하는 것입니다.
따라서 응용 프로그램의 UI 부분을 먼저 사용자 정의하여 쉽게 만들 수 있도록 내장 된 양식 위젯 대신 Freemarker 템플릿을 사용합니다. 우선 Apache OFBiz와 함께 Freemarker 및 Groovy 스크립트를 사용하는 방법을 살펴본 다음 자신 만의 데코레이터를 정의하여 사용자 지정 스타일을 적용하는 방법을 살펴 보겠습니다. 처음에는 OFBiz 기본 데코레이터를 사용할 것입니다.
여기에서 시작하여 주어진 단계를 따르십시오.
1.) 아래와 같이 $ OFBIZ_HOME / plugins / ofbizDemo / webapp / ofbizDemo / crud / AddOfbizDemo.ftl 및 ListOfbizDemo.ftl 위치에 두 개의 Freemarker 파일을 추가합니다.
AddOfbizDemo.ftl
<div class="screenlet-body">
  <form id="createOfbizDemoEvent" method="post" action="<@ofbizUrl>createOfbizDemoEvent</@ofbizUrl>">
    <input type="hidden" name="addOfbizDemoFromFtl" value="Y"/>
    <fieldset>
      <div>
        <span class="label">${uiLabelMap.OfbizDemoType}</span>
        <select name="ofbizDemoTypeId" class='required'>
          <#list ofbizDemoTypes as demoType>
            <option value='${demoType.ofbizDemoTypeId}'>${demoType.description}</option>
          </#list>
        </select>*
      </div>
      <div>
        <span class="label">${uiLabelMap.OfbizDemoFirstName}</span>
        <input type="text" name="firstName" id="firstName" class='required' maxlength="20" />*
      </div>
      <div>
        <span class="label">${uiLabelMap.OfbizDemoLastName}</span>
        <input type="text" name="lastName" id="lastName" class='required' maxlength="20" />*
      </div>
      <div>
        <span class="label">${uiLabelMap.OfbizDemoComment}</span>
        <input type="text" name="comments" id="comments" class='inputBox' size="60" maxlength="255" />
      </div>
    </fieldset>
    <input type="submit" value="${uiLabelMap.CommonAdd}" />
  </form>
</div>
ListOfbizDemo.ftl
<div class="screenlet-body">
  <#if ofbizDemoList?has_content>
    <table cellspacing=0 cellpadding=2 border=0 class="basic-table">
      <thead><tr>
        <th>${uiLabelMap.OfbizDemoId}</th>
        <th>${uiLabelMap.OfbizDemoType}</th>
        <th>${uiLabelMap.OfbizDemoFirstName}</th>
        <th>${uiLabelMap.OfbizDemoLastName}</th>
        <th>${uiLabelMap.OfbizDemoComment}</th>
      </tr></thead>
      <tbody>
        <#list ofbizDemoList as ofbizDemo>
          <tr>
            <td>${ofbizDemo.ofbizDemoId}</td>
            <td>${ofbizDemo.getRelatedOne("OfbizDemoType").get("description", locale)}</td>
            <td>${ofbizDemo.firstName?default("NA")}</td>
            <td>${ofbizDemo.lastName?default("NA")}</td>
            <td>${ofbizDemo.comments!}</td>
          </tr>
        </#list>
       </tbody>
    </table>
  </#if>
</div>
2.) $ OFBIZ_HOME / plugins / ofbizDemo / groovyScripts / crud / ListOfbizDemo.groovy 위치에 데이터 가져 오기 로직을위한 새 Groovy 파일을 추가하고 다음과 같이 코드를 추가하여 OfbizDemo 레코드를 나열합니다.
ofbizDemoTypes = delegator.findList("OfbizDemoType", null, null, null, null, false);
context.ofbizDemoTypes = ofbizDemoTypes;
ofbizDemoList = delegator.findList("OfbizDemo", null, null, null, null, false);
context.ofbizDemoList = ofbizDemoList;
3.) 새로 추가 된 freemarker 및 groovy 파일과 함께 Ofbiz 기본 데코레이터가있는 새 화면 파일을 OfbizDemoScreens.xml에 추가합니다.
OfbizDemoScreens.xml
<screen name="AddOfbizDemoFtl">
    <section>
        <actions>
            <set field="titleProperty" value="PageTitleAddOfbizDemos"/>
            <set field="headerItem" value="addOfbizDemoFtl"/>
            <script location="component://ofbizDemo/groovyScripts/crud/ListOfbizDemo.groovy"/>
        </actions>
        <widgets>
            <decorator-screen name="main-decorator" location="${parameters.mainDecoratorLocation}">
                <decorator-section name="body">
                    <screenlet title="${uiLabelMap.OfbizDemoListOfbizDemos}">
                        <platform-specific>
                            <html><html-template location="component://ofbizDemo/webapp/ofbizDemo/crud/ListOfbizDemo.ftl"/></html>
                         </platform-specific>
                    </screenlet>
                    <screenlet title="${uiLabelMap.OfbizDemoAddOfbizDemoServiceByFtl}">
                        <platform-specific>
                            <html><html-template location="component://ofbizDemo/webapp/ofbizDemo/crud/AddOfbizDemo.ftl"/></html>
                        </platform-specific>
                    </screenlet>
                </decorator-section>
            </decorator-screen>
        </widgets>
    </section>
</screen>
4.) 다음과 같이 OfbizDemo 메뉴에 대한 새 컨트롤러 요청 및 새 항목을 추가합니다.
controller.xml
<!--Request Mapping-->
<request-map uri="AddOfbizDemoFtl">
    <security https="true" auth="true"/>
    <response name="success" type="view" value="AddOfbizDemoFtl"/>
</request-map>

<!--View Mapping-->
<view-map name="AddOfbizDemoFtl" type="screen" page="component://ofbizDemo/widget/OfbizDemoScreens.xml#AddOfbizDemoFtl"/>
OfbizDemoMenus.xml
<menu-item name="addOfbizDemoFtl" title="${uiLabelMap.OfbizDemoAddFtl}"><link target="AddOfbizDemoFtl"/></menu-item>5.) 앱에서 사용하는 새 UI 레이블을 추가합니다.
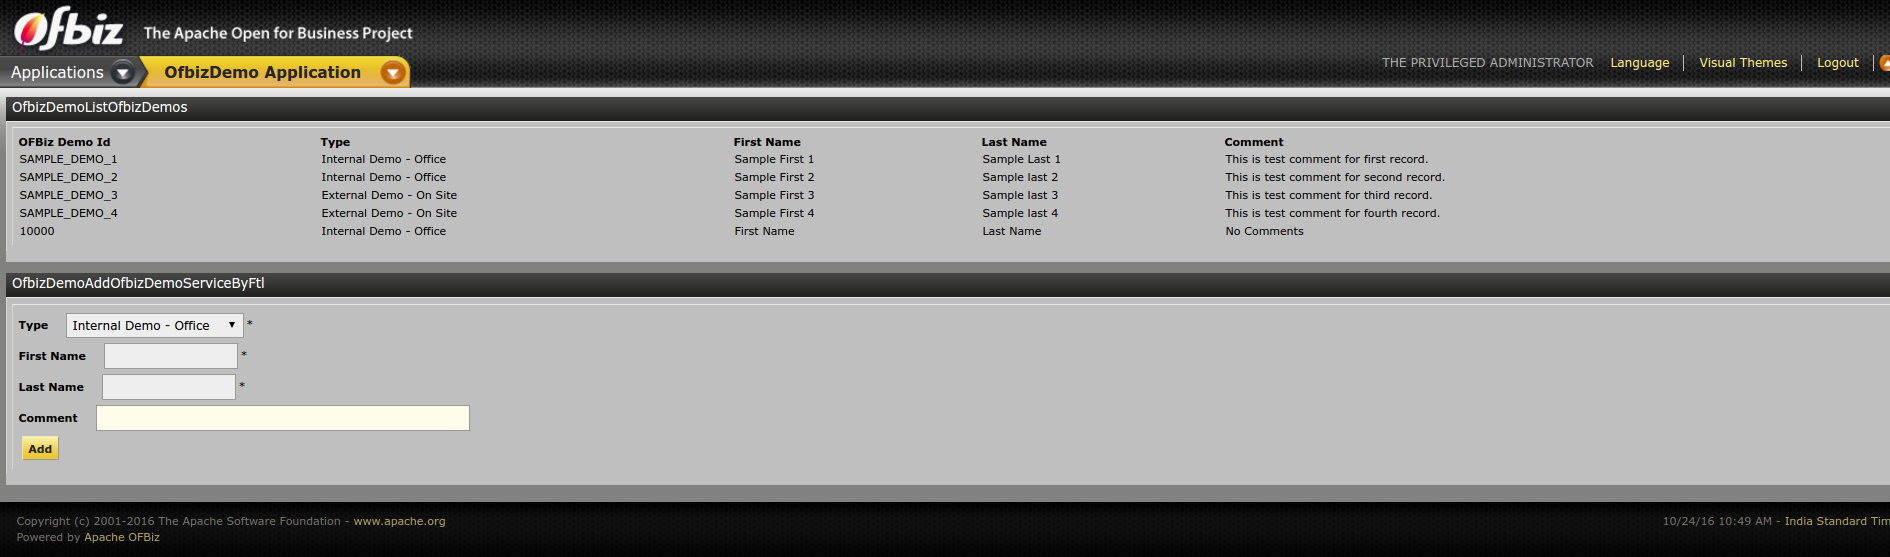
6.) ofbiz 데모 애플리케이션을 실행하고 방금 추가 한 새 탭으로 이동합니다. 다음과 같이 볼 수 있어야합니다.
커스텀 데코레이터 만들기
Freemarker에서 UI를 사용하면 자유롭게 실험하고 CSS를 조정하고 사용자가 원하는 방식으로 애플리케이션을 만들 수 있습니다. 이 섹션에서는 어떻게 할 수 있는지 살펴 보겠습니다.
애플리케이션 뷰에 대한 커스텀 데코레이터를 정의하여이를 수행 할 것입니다. OFBiz의 데코레이터는 다른 애플리케이션 화면에 포함하여 나중에 정의하고 재사용하는 화면에 불과합니다. 이미 OFBiz와 함께 제공되는 기본 데코레이터 (main-decorator –> ApplicationDecorator)를 사용하고 있습니다. 지금까지 준비한 화면을 살펴보면이 메인 데코레이터를 사용하고 있음을 알 수 있습니다. OfbizDemoScreens.xml의 아래 줄을 참조하십시오.
OfbizDemoScreens.xml
<decorator-screen name="main-decorator" location="${parameters.mainDecoratorLocation}">mainDecoratorLocation은 webapp의 web.xml에 정의되어 있으므로 매개 변수 맵에서 사용할 수 있습니다.
web.xml
<context-param>
    <description>The
 location of the main-decorator screen to use for this webapp; referred
to as a context variable in screen def XML files.</description>
    <param-name>mainDecoratorLocation</param-name>
    <param-value>component://ofbizDemo/widget/CommonScreens.xml</param-value>
</context-param>
이제 커스텀 스타일링으로 자신 만의 데코레이터를 정의 할 때입니다.
아래 주어진 샘플에서 우리는이 튜토리얼의 마지막 부분에서 개발 한 샘플 Freemarker 화면의 스타일을 지정하기 위해 Bootstrap을 사용할 것입니다. 아래 단계에 따라 자신 만의 데코레이터를 만드세요.
1.) Bootstrap v3.3.7 디렉토리를 다운로드 하십시오 . 여기 에서 다운로드하여 압축을 풀 수 있습니다.
2.) $ OFBIZ_HOME / plugins / ofbizDemo / webapp / ofbizDemo / 위치에 “css”및 “js”라는 두 개의 새 디렉토리를 만듭니다.
3.) bootstrap-3.3.7 / dist / css / bootstrap.min.css를 $ OFBIZ_HOME / plugins / ofbizDemo / webapp / ofbizDemo / css에 복사합니다.
4.) bootstrap-3.3.7 / dist / js / bootstrap.min.js를 $ OFBIZ_HOME / plugins / ofbizDemo / webapp / ofbizDemo / js에 복사합니다.
5.) $ OFBIZ_HOME / plugins / ofbizDemo / webapp / ofbizDemo / WEB-INF / web.xml을 열고 아래 표시된대로 끝에 allowedPaths에 css 및 js 디렉터리에 대한 항목을 만듭니다.
web.xml
<init-param>
    <param-name>allowedPaths</param-name>
    <param-value>/error:/control:/select:/index.html:/index.jsp:/default.html:/default.jsp:/images:/includes/maincss.css:/css:/js</param-value>
</init-param>
6.) $ OFBIZ_HOME / plugins / ofbizDemo / webapp / ofbizDemo / 위치에 “includes”라는 새 디렉터리를 추가하고 방금 추가 한 PreBody.ftl 및 PostBody.ftl이라는 새 디렉터리에 두 개의 새 파일을 만듭니다. 데코레이터 화면에서이 두 파일을 사용 (포함)하여 완전한 HTML 페이지를 만들 것입니다.
PreBody.ftl
<html>
  <head>
    <title>${layoutSettings.companyName}</title>
    <meta name="viewport" content="width=device-width, user-scalable=no"/>
    <#if webSiteFaviconContent?has_content>
      <link rel="shortcut icon" href="">
    </#if>
    <#list layoutSettings.styleSheets as styleSheet>
      <link rel="stylesheet" href="${StringUtil.wrapString(styleSheet)}" type="text/css"/>
    </#list>
    <#list layoutSettings.javaScripts as javaScript>
      <script type="text/javascript" src="${StringUtil.wrapString(javaScript)}"></script>
    </#list>
  </head>
  <body data-offset="125">
    <h4 align="center"> ==================Page PreBody Starts From Decorator Screen========================= </h4>
    <div class="container menus" id="container">
      <div class="row">
        <div class="col-sm-12">
          <ul id="page-title" class="breadcrumb">
            <li>
                <a href="<@ofbizUrl>main</@ofbizUrl>">Main</a>
            </li>
            <li class="active"><span class="flipper-title">${StringUtil.wrapString(uiLabelMap[titleProperty])}</span></li>
            <li class="pull-right">
              <a href="<@ofbizUrl>logout</@ofbizUrl>" title="${uiLabelMap.CommonLogout}">logout</i></a>
            </li>
          </ul>
        </div>
      </div>
      <div class="row">
        <div class="col-lg-12 header-col">
          <div id="main-content">
              <h4 align="center"> ==================Page PreBody Ends From Decorator Screen=========================</h4>
              <h4 align="center"> ==================Page Body starts From Screen=========================</h4>
PostBody.ftl
<#-- Close the tags opened in the PreBody section -->
          </div>
        </div>
      </div>
    </div>
    <h4 align="center"> ==================Page PostBody and Page body in general ends here from Decorator Screen=========================</h4>
  </body>
</html>
7.) 구성 요소 $ OFBIZ_HOME / plugins / ofbizDemo / widget / CommonScreens.xml의 Common Screens 파일을 엽니 다.이 파일은 사용자 지정 데코레이터를 정의 할 파일입니다.
8.) 아래와 같이 “OfbizDemoCommonDecorator”(앱의 사용자 지정 데코레이터 역할을 할)라는 이름의 업데이트 화면 :
CommonScreens.xml
<screen name="OfbizDemoCommonDecorator">
    <section>
        <actions>
            <property-map resource="OfbizDemoUiLabels" map-name="uiLabelMap" global="true"/>
            <property-map resource="CommonUiLabels" map-name="uiLabelMap" global="true"/>

            <set field="layoutSettings.companyName" from-field="uiLabelMap.OfbizDemoCompanyName" global="true"/>

            <!-- Including custom CSS Styles that you want to use in your application view. [] in field can be used to
                 set the order of loading CSS files to load if there are multiple -->
            <set field="layoutSettings.styleSheets[]" value="/ofbizDemo/css/bootstrap.min.css"/>

            <!-- Including custom JS that you want to use in your application view. [] in field can be used to
                 set the order of loading of JS files to load if there are multiple -->
           <set field="layoutSettings.javaScripts[+0]" value="/ofbizDemo/js/bootstrap.min.js" global="true"/>
        </actions>
        <widgets>
            <section>
                <condition>
                    <if-has-permission permission="OFBIZDEMO" action="_VIEW"/>
                </condition>
                <widgets>
                    <platform-specific><html><html-template location="component://ofbizDemo/webapp/ofbizDemo/includes/PreBody.ftl"/></html></platform-specific>
                    <decorator-section-include name="pre-body"/>
                    <decorator-section-include name="body"/>
                    <platform-specific><html><html-template location="component://ofbizDemo/webapp/ofbizDemo/includes/PostBody.ftl"/></html></platform-specific>
                </widgets>
                <fail-widgets>
                    <label style="h3">${uiLabelMap.OfbizDemoViewPermissionError}</label>
                </fail-widgets>
            </section>
        </widgets>
    </section>
</screen>
위의 코드에서 layoutSettings.styleSheets [] 및 layoutSettings.javaScripts [+0] 표기법을 알 수 있습니다. layoutSettings를 사용할 수 있습니다. 모든 파일에 대한 표기법.
빈 대괄호가있는 스타일 시트 또는 자바 스크립트를 주문하려면 layoutSettings 의 끝에 파일을 추가하면됩니다 . styleSheets 또는 layoutSettings. JavaScripts 목록, [+0]이 앞에 추가됩니다.
9.) 마지막 부분에서 만든 Freemarker 화면에서이 데코레이터를 다음과 같이 사용합니다.
OfbizDemoScreens.xml
<screen name="AddOfbizDemoFtl">
    <section>
        <actions>
            <set field="titleProperty" value="OfbizDemoAddOfbizDemoFtl"/>
            <set field="headerItem" value="addOfbizDemoFtl"/>
            <script location="component://ofbizDemo/groovyScripts/crud/ListOfbizDemo.groovy"/>
        </actions>
        <widgets>
            <decorator-screen name="OfbizDemoCommonDecorator" location="${parameters.mainDecoratorLocation}">
                <decorator-section name="body">
                     <label style="h4" text="${uiLabelMap.OfbizDemoListOfbizDemos}"/>
                     <platform-specific>
                         <html><html-template location="component://ofbizDemo/webapp/ofbizDemo/crud/ListOfbizDemo.ftl"/></html>
                     </platform-specific>
                     <label style="h4" text="${uiLabelMap.OfbizDemoAddOfbizDemoFtl}"/>
                     <platform-specific>
                         <html><html-template location="component://ofbizDemo/webapp/ofbizDemo/crud/AddOfbizDemo.ftl"/></html>
                     </platform-specific>
                </decorator-section>
            </decorator-screen>
        </widgets>
    </section>
</screen>
10.) HTML 웹 표준을 따르고 CSS를 다음과 같이 적용하도록 FTL 파일을 업데이트합니다.
AddOfbizDemo.ftl
<form method="post" action="<@ofbizUrl>createOfbizDemoEventFtl</@ofbizUrl>" name="createOfbizDemoEvent" class="form-horizontal">
  <div class="control-group">
    <label class="control-label" for="ofbizDemoTypeId">${uiLabelMap.OfbizDemoType}</label>
    <div class="controls">
      <select id="ofbizDemoTypeId" name="ofbizDemoTypeId">
        <#list ofbizDemoTypes as demoType>
          <option value='${demoType.ofbizDemoTypeId}'>${demoType.description}</option>
        </#list>
      </select>
    </div>
  </div>
  <div class="control-group">
    <label class="control-label" for="firstName">${uiLabelMap.OfbizDemoFirstName}</label>
    <div class="controls">
      <input type="text" id="firstName" name="firstName" required>
    </div>
  </div>
  <div class="control-group">
    <label class="control-label" for="lastName">${uiLabelMap.OfbizDemoLastName}</label>
    <div class="controls">
      <input type="text" id="lastName" name="lastName" required>
    </div>
  </div>
  <div class="control-group">
    <label class="control-label" for="comments">${uiLabelMap.OfbizDemoComment}</label>
    <div class="controls">
      <input type="text" id="comments" name="comments">
    </div>
  </div>
  <div class="control-group">
    <div class="controls">
      <button type="submit" class="btn">${uiLabelMap.CommonAdd}</button>
    </div>
  </div>
</form>
ListOfbizDemo.ftl
<table class="table table-bordered table-striped table-hover">
<thead>
<tr>
<th>${uiLabelMap.OfbizDemoId}</th>
<th>${uiLabelMap.OfbizDemoType}</th>
<th>${uiLabelMap.OfbizDemoFirstName}</th>
<th>${uiLabelMap.OfbizDemoLastName}</th>
<th>${uiLabelMap.OfbizDemoComment}</th>
</tr>
</thead>
<tbody>
<#list ofbizDemoList as ofbizDemo>
<tr>
<td>${ofbizDemo.ofbizDemoId}</td>
<td>${ofbizDemo.getRelatedOne("OfbizDemoType").get("description", locale)}</td>
<td>${ofbizDemo.firstName?default("NA")}</td>
<td>${ofbizDemo.lastName?default("NA")}</td>
<td>${ofbizDemo.comments!}</td>
</tr>
</#list>
</tbody>
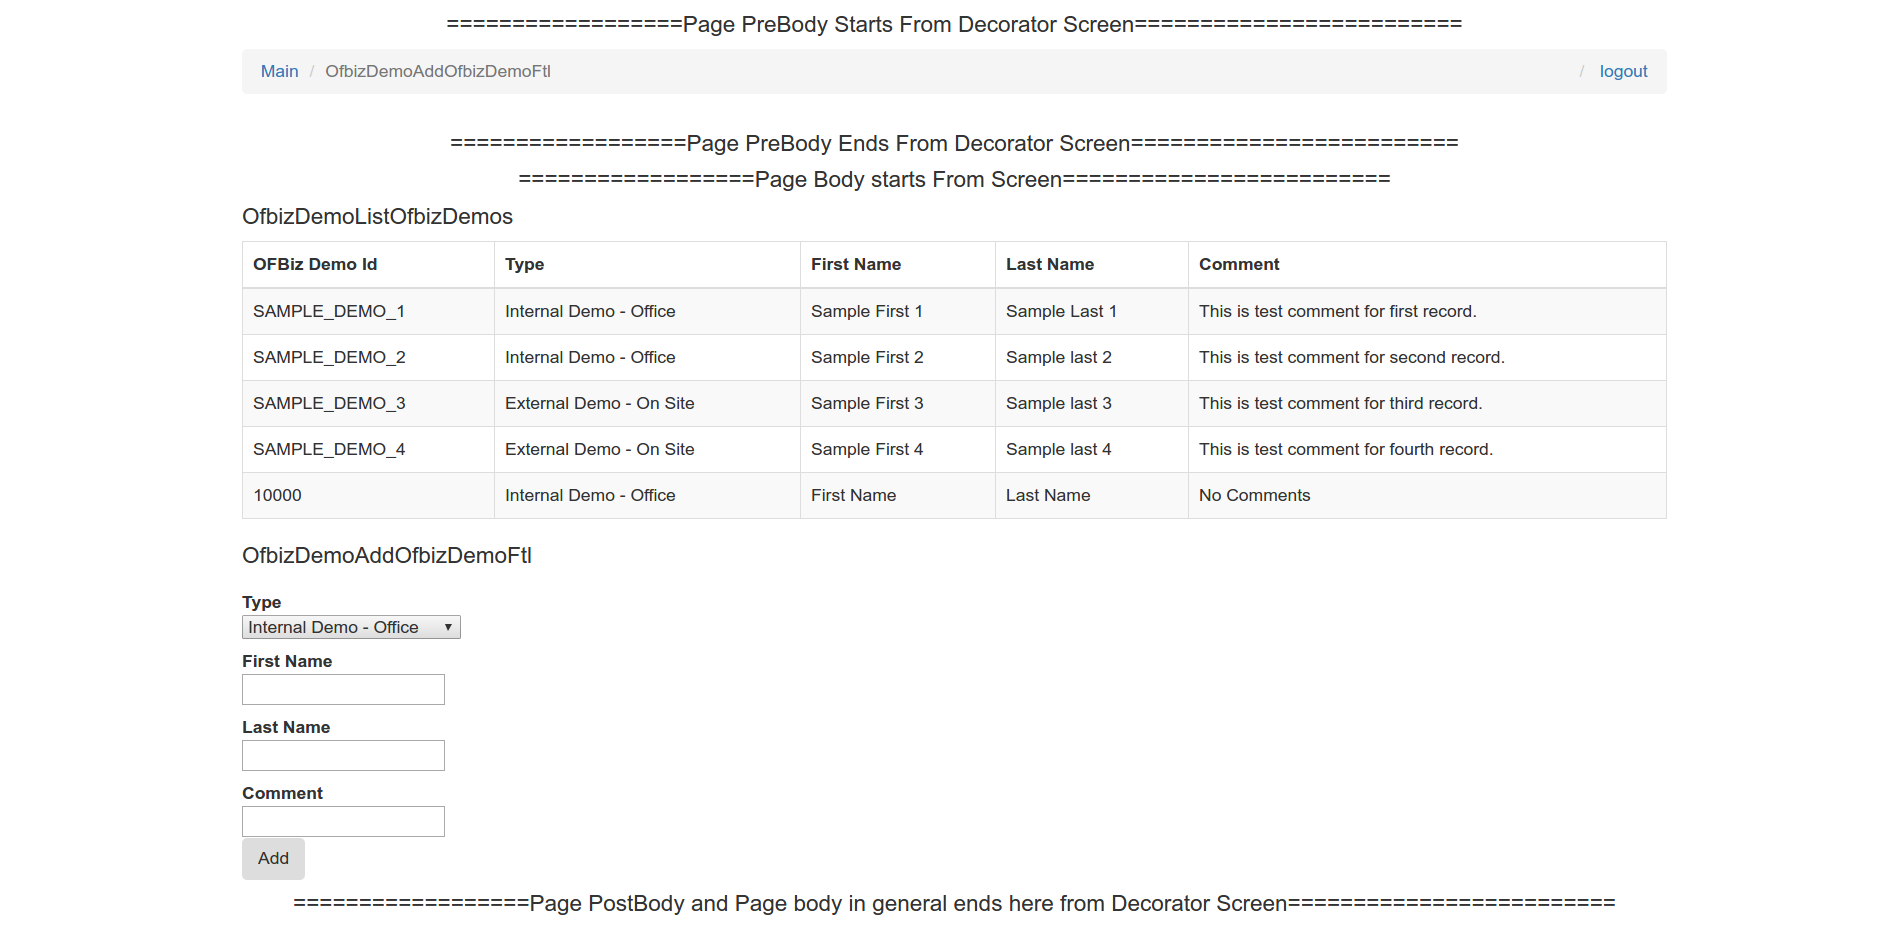
</table> 10. 이제 web.xml에서 allowedPaths에 항목을 만들었으므로 OFBiz를 다시 시작합니다. 다시로드 할 때 https : // localhost : 8443 / ofbizDemo / control / AddOfbizDemoFtl 을 누르면 기본 OFBiz 테마를 사용하는 대신 사용한 사용자 지정 스타일이있는 페이지가 표시됩니다. 다음과 같아야합니다.
이제 원하는대로 재생할 수 있습니다. 머리글을 변경하거나 새 머리글을 추가하고 바닥 글을 추가하고 유효성 검사를하는 등의 작업을 시도하십시오. 이렇게하면 Freemarker 템플릿, CSS 및 JS를 사용하여 OFBiz의 UI 레이어를 사용자 지정할 수 있습니다.
자신의 CSS 또는 JS 파일을 추가하고 싶을 수 있으며, 부트 스트랩 파일에 대해했던 것과 동일한 방식으로 포함 할 수 있습니다.
다음은 뭐죠 ?
이 자습서에서 모든 단계를 수행하고 실습 응용 프로그램을 개발했다면 OFBiz의 다른 구현을 이해하는 데 도움이 될 것입니다. 이러한 것들이 OFBiz에서 일하는 기본 토대입니다. 이제 OFBiz에서 개발을 시작하는 방법을 알았습니다. 이 튜토리얼에서 제공하는 추가 링크를 남겨 두지 마십시오. 여기에 자세히 설명 된 내용을 이해하는 데 많은 도움이 될 것입니다. FAQ Tips Tricks Cookbook HowTo
에서 도움이 될 수있는 또 다른 좋은 자료가 있습니다 . 이제 다음 단계는 OFBiz 및 OOTB 데이터 모델에서 OOTB 프로세스 흐름을 이해하기 위해 실제로 잘 이해해야하는 비즈니스 프로세스입니다. 이에 대한 책은 다음에서 구할 수 있습니다. OFBiz Related Books
. OFBiz OOTB 사용 가능한 데이터 모델 및 비즈니스 프로세스를 잘 이해하면 더 나은 비즈니스 솔루션을 구축하는 데 도움이됩니다.
이제 뛰어들 준비가되었습니다. OFBiz 세계에 오신 것을 환영합니다.